Showing posts with label tutorial. Show all posts

Monday, July 30, 2012

All Twisted...A Tutorial

A while back I had posted this tutorial on The Rubber Cafe blog, but realized I never posted to my own blog...cause...I'm just not that organized here.
So...I thought I would take the time to share the tutorial here...just in case a visitor didn't happen by The Rubber Cafe back when I was posting there.

Double and Single Twisted Easel Card


For the double easel card (no card pictured) you’ll start off what a square sheet of paper. I’m using 8 ½" x 8 ½". Score at the half way point and turn, score again at the half way point. In this case, I scored at 4 ¼" in both directions. On one side, cut down your score line just to the first score line. Score from the outside corner to the center on each of the cut sections. Fold all of your score lines. Use your score tool as a bone folder and run across your score lines to get a good crease. A sharp score line with help the easel keep shape.
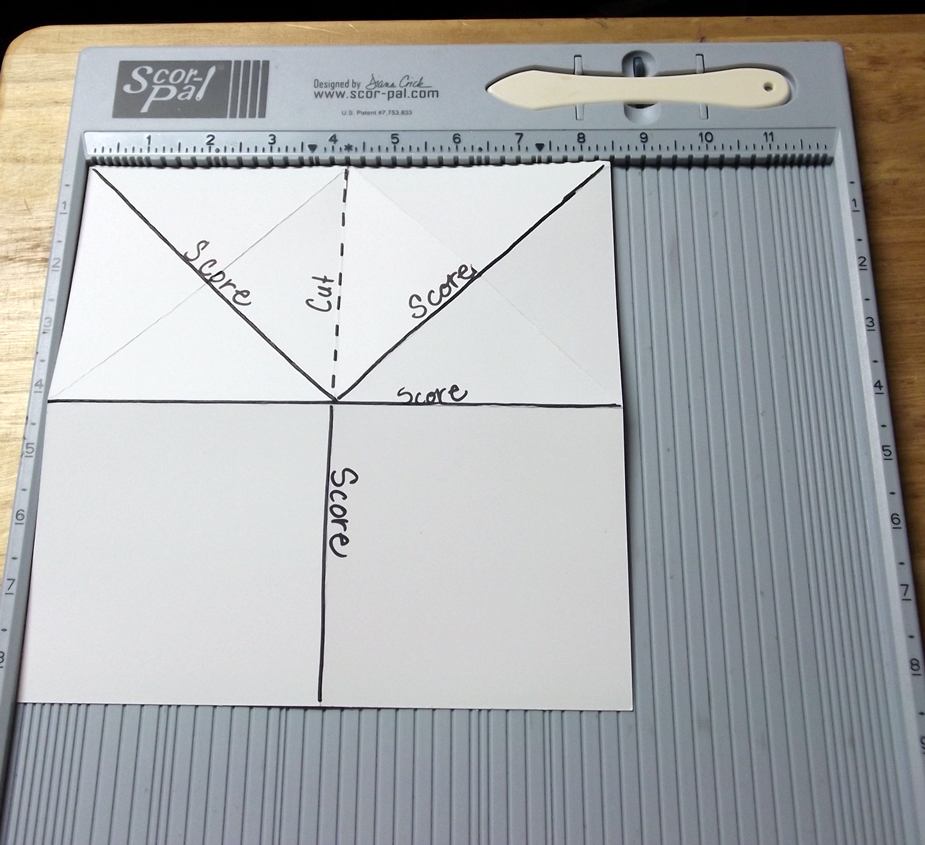


For the single easel card I started off with an 8 ½" x 4 ½" piece of cardstock and lined the cardstock to 8 ½" and scored at 4 ¼" and then scored again from left outside corner to the right middle corner. Fold all score lines the sharpen the creases to hold the easel form.


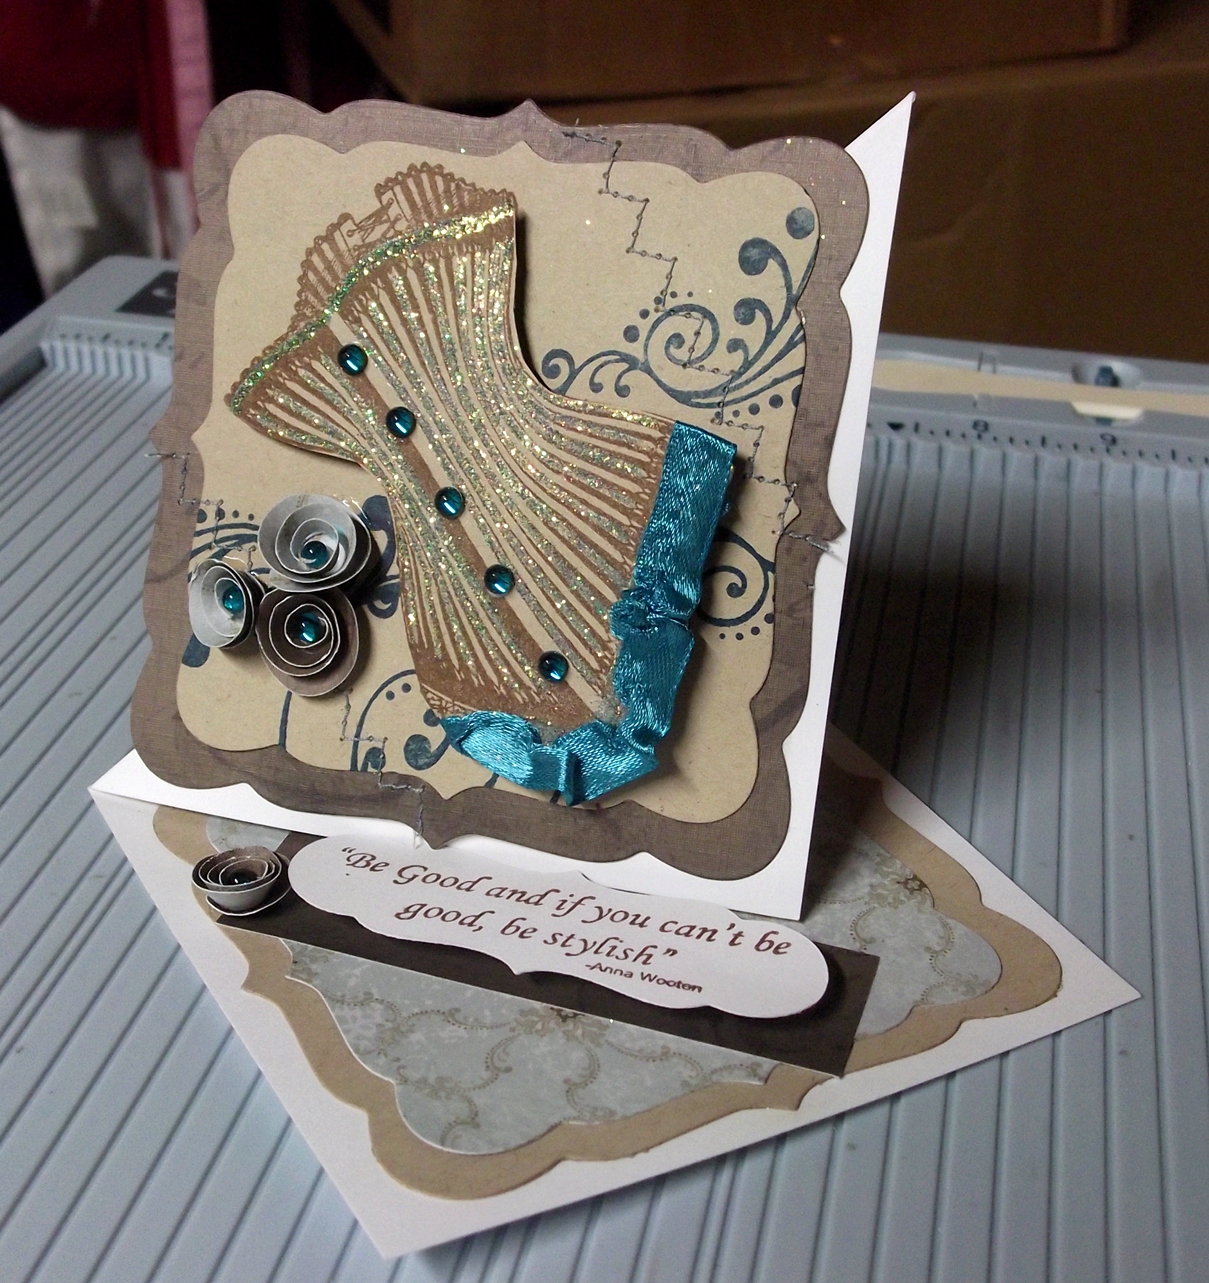
The rest is all personal taste. I used stamps from The Rubber Cafe...Be Stylish set along with fleurididy 1. I stamped the corset then stamped it again in the same color. Cut out the top and popped it up. The bottom of the corset is just ribbon that had been pulled to give it a ruffle. I stamped fleurididy 1 in deep lagoon versafine ink. Because this week’s challenge is to do a little sewing…I added just a touch of sewing to each side of the corset. I think I should stick to faux sewing next time. The sentiment from Be Stylish is popped up to hold open the easel.

Thanks for stopping by and have a great day Free Smiley Courtesy of www.millan.net

Thursday, June 9, 2011

Squash Card Tutorial

 So...I received a couple of emails and comments asking for a tutorial on the squash card.


It's a simple but cool card to give.


What you'll need to start is 3 pieces of cardstock 8 1/2" square.  Actually...you can start with any size square....mine is 81/2" which folds down to 4 1/4".

Start by scoring in half (4 1/4") on one side, turn 1/4 turn and score in half again (4 1/4"), then score from corner to corner...in one direction only.

It should look like this:

 Fold your score lines so that the diagonal line folds in one direction and your cross lines fold the other. Repeat this for all three pieces. 

To assemble, Take the middle piece and place it with the diagonal score line facing down and the point facing up then add adhesive on unscored sections of your cardstock.


 Connect the pieces together by overlapping the unscored sections, adding the front and back with the diagonal score line facing up and the point facing down, while the middle is still facing up. 


 Finally...Decorate and enjoy.


All stamps used for this project are from The Rubber Cafe.  On the front I've used 2 stamps from the Vintage Treasures, the time piece and the word background.  The dragonfly is from the Asian Floral set and if you look closely the teal paper behind the dragonfly is stamped with a stamp from the Background Basics 1 set.  The dragonfly is colored in with you're so fine glitter...a teal for the center and a translucent white to finish it off.


The inside uses the same decorative cardstock.  Three panels are left unfinished, I'm going to add pictures to those later.  The last panel uses the sentiment "you make me smile" from the Fabulous Phrases set.  


Thanks for stopping by and I hope you enjoyed this tutorial.  Please leave a comment letting me know what you think.  


Lisa

Wednesday, December 9, 2009

It's Smaller Than a Bread Box


Happy chilly Wednesday. In some areas It's way colder than it is here…but I am freezing this morning. It's 48ºf here and to me…that's too cold. So…this morning I thought I would share a project using sunny warm colors.

Last year about this time I had been searching blogs and tutorials for better ways to store my cards for gifts and just for me. I found a few that I liked…but they took too much time and too much paper. I wanted to use this in a class I was teaching so I had to make it fast and easy. After a bit of math (my mom always told me those math classes would come in handy some day) I came up with this fun and cute card holder.

What you'll need:
· 12" x 12" cardstock or decorative paper
· Scor-pal or scoring tool.
· Very tacky tape (red line, scor-tape) or glue
· Embellishments (a great way to use up your scraps)


1. Score your cardstock at 3" & 6" as shown
2. Turn your paper a quarter turn and score again at 3" & 9" as shown
3. Fold all of your score lines. Always fold away from your score mark. When you score, the fibers of your paper are broken up to fold that way.
4. Cut into your 3" & 9" margins to the first intersection on the 3" & 6" lines. Do this on both sides.
5. Trim diagonally as shown. This is the top of your box.
6. Add your adhesive to the outside of the middle flaps and the inside of the bottom flaps as shown.
7. Fold the top diagonally cut flap over the outside of the middle flap on each side of your box.
8. Fold the bottom flap over the top and middle flap on both sides to form the bottom of your box.


To make your box sturdier, add a little extra cardstock around the inside of your box. This gives it a finished decorative look but also sturdies it up a bit. For this project I used Cosmo Cricket paper and stamps from The Rubber Café. The finished project is 6" wide and fits most cards. It also fits nicely on your shelf and takes up less room than a bread box. I hope you've enjoyed this tutorial. Comments are welcome.