Monday, July 30, 2012

All Twisted...A Tutorial

A while back I had posted this tutorial on The Rubber Cafe blog, but realized I never posted to my own blog...cause...I'm just not that organized here.
So...I thought I would take the time to share the tutorial here...just in case a visitor didn't happen by The Rubber Cafe back when I was posting there.

Double and Single Twisted Easel Card


For the double easel card (no card pictured) you’ll start off what a square sheet of paper. I’m using 8 ½" x 8 ½". Score at the half way point and turn, score again at the half way point. In this case, I scored at 4 ¼" in both directions. On one side, cut down your score line just to the first score line. Score from the outside corner to the center on each of the cut sections. Fold all of your score lines. Use your score tool as a bone folder and run across your score lines to get a good crease. A sharp score line with help the easel keep shape.


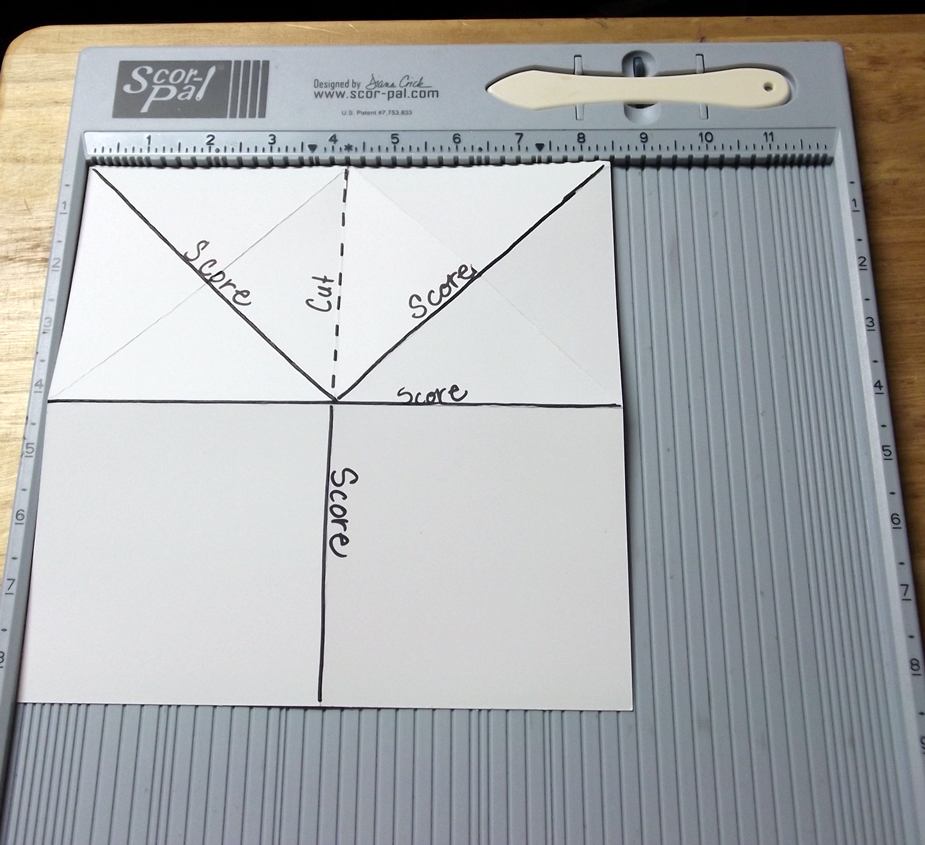
For the single easel card I started off with an 8 ½" x 4 ½" piece of cardstock and lined the cardstock to 8 ½" and scored at 4 ¼" and then scored again from left outside corner to the right middle corner. Fold all score lines the sharpen the creases to hold the easel form.


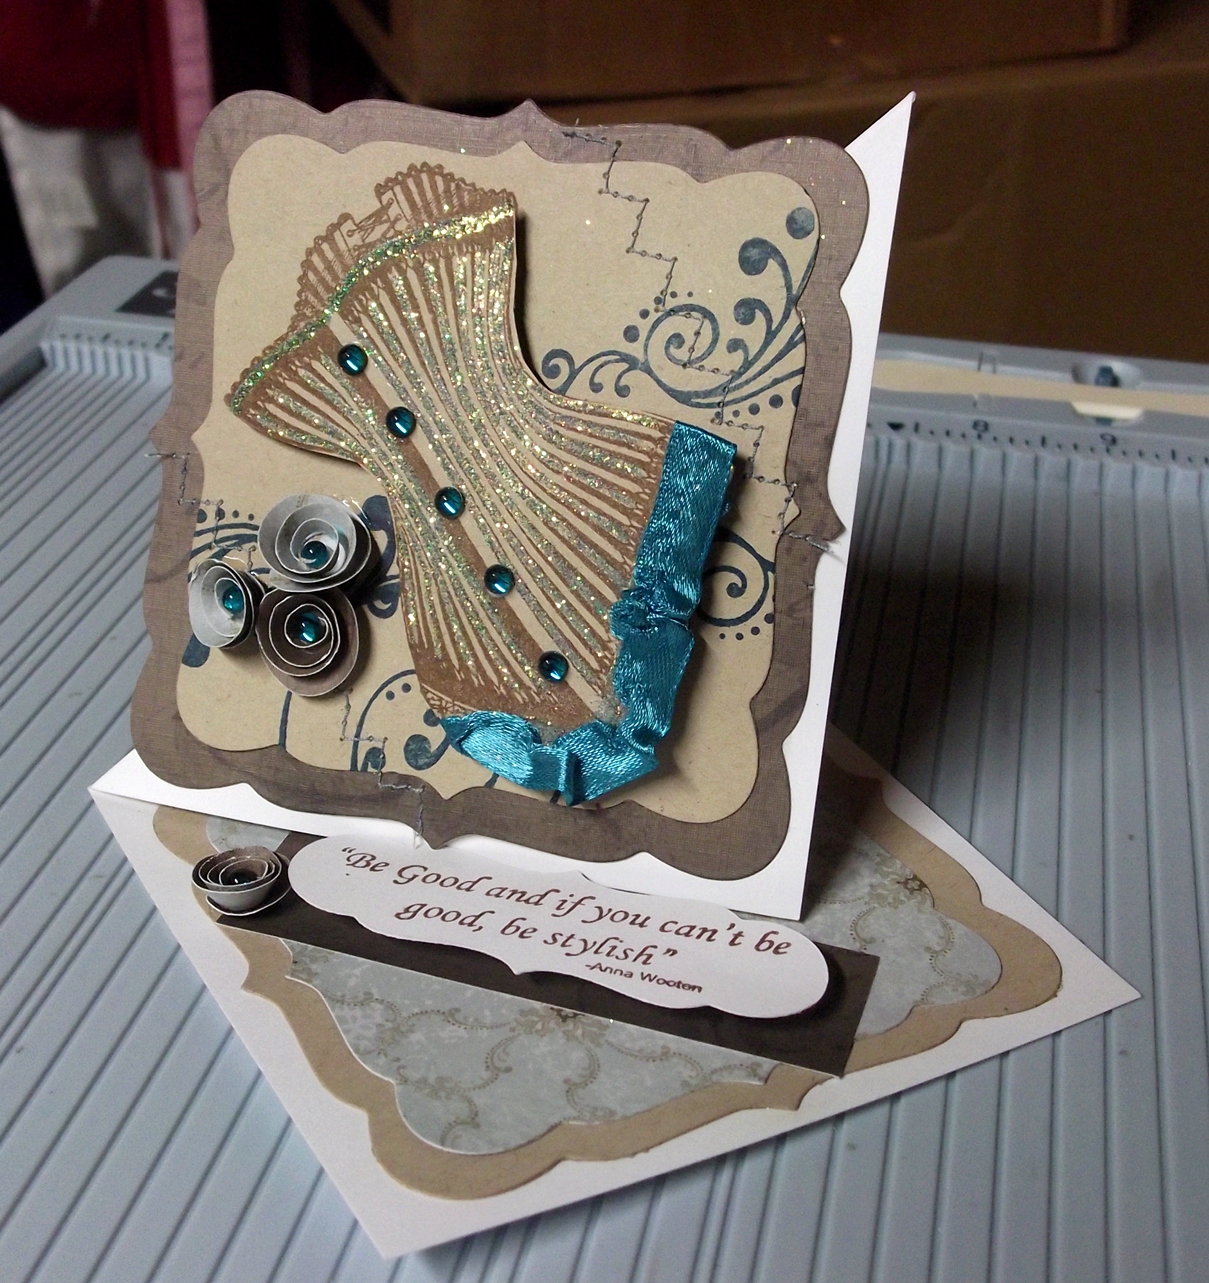
The rest is all personal taste. I used stamps from The Rubber Cafe...Be Stylish set along with fleurididy 1. I stamped the corset then stamped it again in the same color. Cut out the top and popped it up. The bottom of the corset is just ribbon that had been pulled to give it a ruffle. I stamped fleurididy 1 in deep lagoon versafine ink. Because this week’s challenge is to do a little sewing…I added just a touch of sewing to each side of the corset. I think I should stick to faux sewing next time. The sentiment from Be Stylish is popped up to hold open the easel.

Thanks for stopping by and have a great day Free Smiley Courtesy of www.millan.net

Sunday, March 18, 2012

Where have I been?

I've been skating, moving, going back to school and in general...dealing with life.  I haven't crafted much...but what I've crafted...I would like to share.  The other day I found this
It inspired me to make this set of cards...that doesn't happen often enough.


I swiped 3 blue colors up the side of the card stock using a direct to paper method.  The peacock and sentiment are from The Rubber Cafe.  I finished it off with a teal blue ribbon.  It's a simple no layers card that I thought would be great for a gift, so I made a few.  At some point I'll bunch them up with a few other simple cards and envie's to package for a friend of mine.  

Thanks for stopping by and have a beautiful day.

Thursday, June 9, 2011

Squash Card Tutorial

 So...I received a couple of emails and comments asking for a tutorial on the squash card.


It's a simple but cool card to give.


What you'll need to start is 3 pieces of cardstock 8 1/2" square.  Actually...you can start with any size square....mine is 81/2" which folds down to 4 1/4".

Start by scoring in half (4 1/4") on one side, turn 1/4 turn and score in half again (4 1/4"), then score from corner to corner...in one direction only.

It should look like this:

 Fold your score lines so that the diagonal line folds in one direction and your cross lines fold the other. Repeat this for all three pieces. 

To assemble, Take the middle piece and place it with the diagonal score line facing down and the point facing up then add adhesive on unscored sections of your cardstock.


 Connect the pieces together by overlapping the unscored sections, adding the front and back with the diagonal score line facing up and the point facing down, while the middle is still facing up. 


 Finally...Decorate and enjoy.


All stamps used for this project are from The Rubber Cafe.  On the front I've used 2 stamps from the Vintage Treasures, the time piece and the word background.  The dragonfly is from the Asian Floral set and if you look closely the teal paper behind the dragonfly is stamped with a stamp from the Background Basics 1 set.  The dragonfly is colored in with you're so fine glitter...a teal for the center and a translucent white to finish it off.


The inside uses the same decorative cardstock.  Three panels are left unfinished, I'm going to add pictures to those later.  The last panel uses the sentiment "you make me smile" from the Fabulous Phrases set.  


Thanks for stopping by and I hope you enjoyed this tutorial.  Please leave a comment letting me know what you think.  


Lisa

Tiny Tutorial

I had been checking out other blogs here and there and came across this box (can't recall where). I went searching for directions only to find out that it had been cut from some sort of online template. I'm not really into buying templates. I'm more into buying stamps. I went to work figuring out how to make it without a template and...in the spirit of saving you a little money...I've created this little tutorial.


What you'll need:
*Cardstock 6" x 8 1/2"
*Stamps and embellishments for decorating
*Adhesive (only for decorating your box)
*Scor-Pal or Scor-Buddy

Directions:

Line your cardstock up against your Scor-Pal or Scor-Buddy and score at 2, 4, 6, & 8.

Turn your paper a 1/4 turn lining up the short scored edge to the top and score at 1 1/2 just to the second score line, 2 & 4 all the way down, and again at 4 1/2 to the second score line. This will be the top of the box.

flip your paper over and line a bottom corner (not having extra scor lines) into the 6" line. Score corner to corner in the first square and skipping the second square score again corner to corner in the third square. Turn 1/4 turn staying at the bottom and repeate the score again lining it up at the 6" score line.

Cut the top 3 corners off as shown. Cutting all the red lines and cutting off the X'd boxes.


Fold all your score lines, folding all the corners inward.

Close the box by sliding the tabs on the top of the box into the base of the box and it will stay shut.

You're ready to decorate.  Don't forget to leave a comment letting me know what you think.  Enjoy...thanks for stopping by.

Lisa

Thursday, May 26, 2011

New York...Gotta Love it

I can't wait to get back there again.  It was soooo beautiful.  The architecture was amazing.  I couldn't imagine what it would have been like there back when these buildings were being built.  I can't tell you what half of them are...but wow...what beautiful buildings.  Some buildings were built to house mass tenants and didn't even have running water or electricity back in the day.  Can you imagine no running water or electricity?


\


This trip is a must see again.  There is sooo much to look at and sooo much history...it's worth visiting more than once in a lifetime.
.